Proxy Discord Bot Guide
Jump in to learn how to make your own discord proxy bots!
What is a proxy bot?
A proxy bot is a discord bot that takes basic input such as text or an image through a slash command and then sends the content as a message with its own profile picture, name, and even bio! These profiles can be customized just like any regular discord profile through the discord developer portal, but this way you can have multiple profiles all throughout discord, even in dms! While bots like Pluralkit are great and less work to set up and maintain, the benefit for these bots is that they can work in direct messages.Proxy bots have many uses! From plural people giving a system member their own discord profile to to having a profile you can pull up for a character you want to roleplay!
Some things to keep in mind!
to use the bots, the program must be running, meaning that your computer with the bot program must be on as well
you can use the bots on mobile so long as the program is running on a computer!
it is VERY important that you make the bot private (instructions for how will be in the guide) to prevent other people from adding it to their profile and using it as well
the bot we will make in this guide is very simple, you can expand on it of course, but in this guide we will only be making it able to proxy text or one image at a time
you have to make a new bot for each different person you would like to proxy, only one person per discord app and program, and you have to run each different app separately
Guide
This guide will be split up into multiple parts, step by step. If you already know how to do something, feel free to skip to the next part of the guide!
Making a Discord App
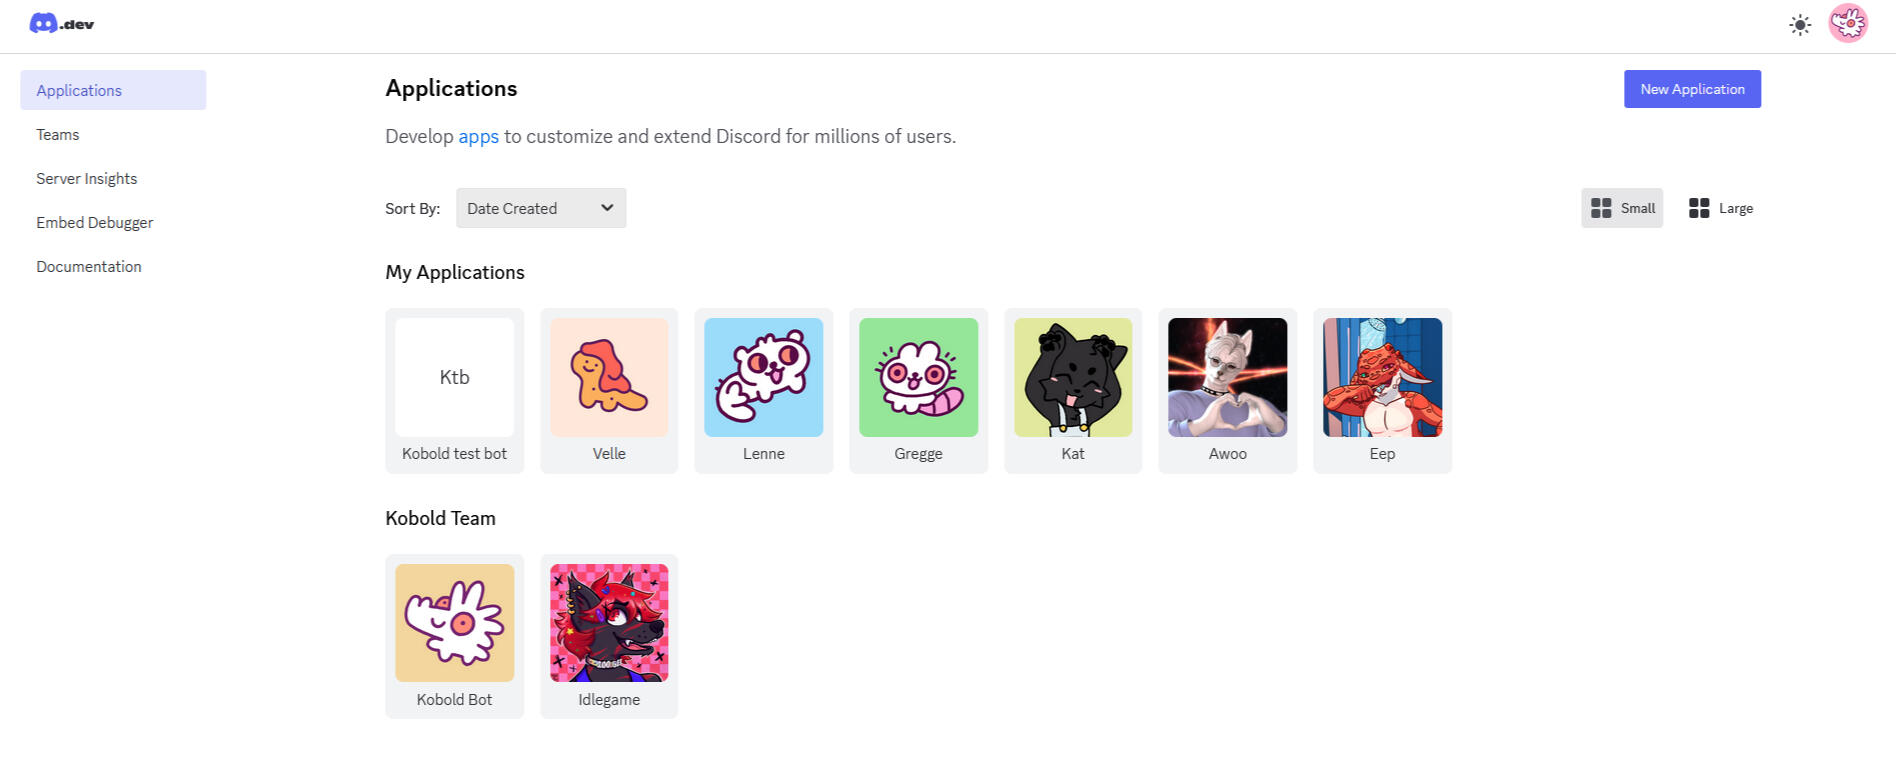
The first step to making a proxy bot is making a discord app! To begin, go to the Discord Developer Portal (link). It should look like this without any applications. Bookmark this page to come back to to edit the looks of your proxy bot. From here, click on "New Application" in the top right.
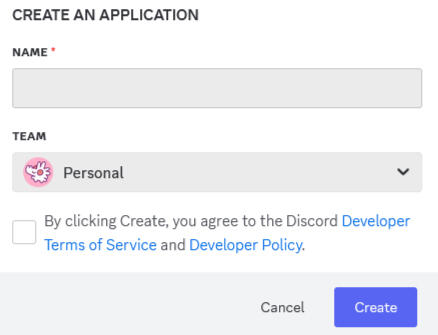
You should be prompted with a box like this. Enter the name of the bot you would like, however this can be changed later. Personal team, and then agree to the terms of service and hit create. You might be prompted with a captcha.
Once you have created the bot, you will land on a page that looks like this. From here you can change the icon and description for the bot. These act like the profile picture and user bios of a regular discord account. First, let's head over to installation on the left side towards the top.

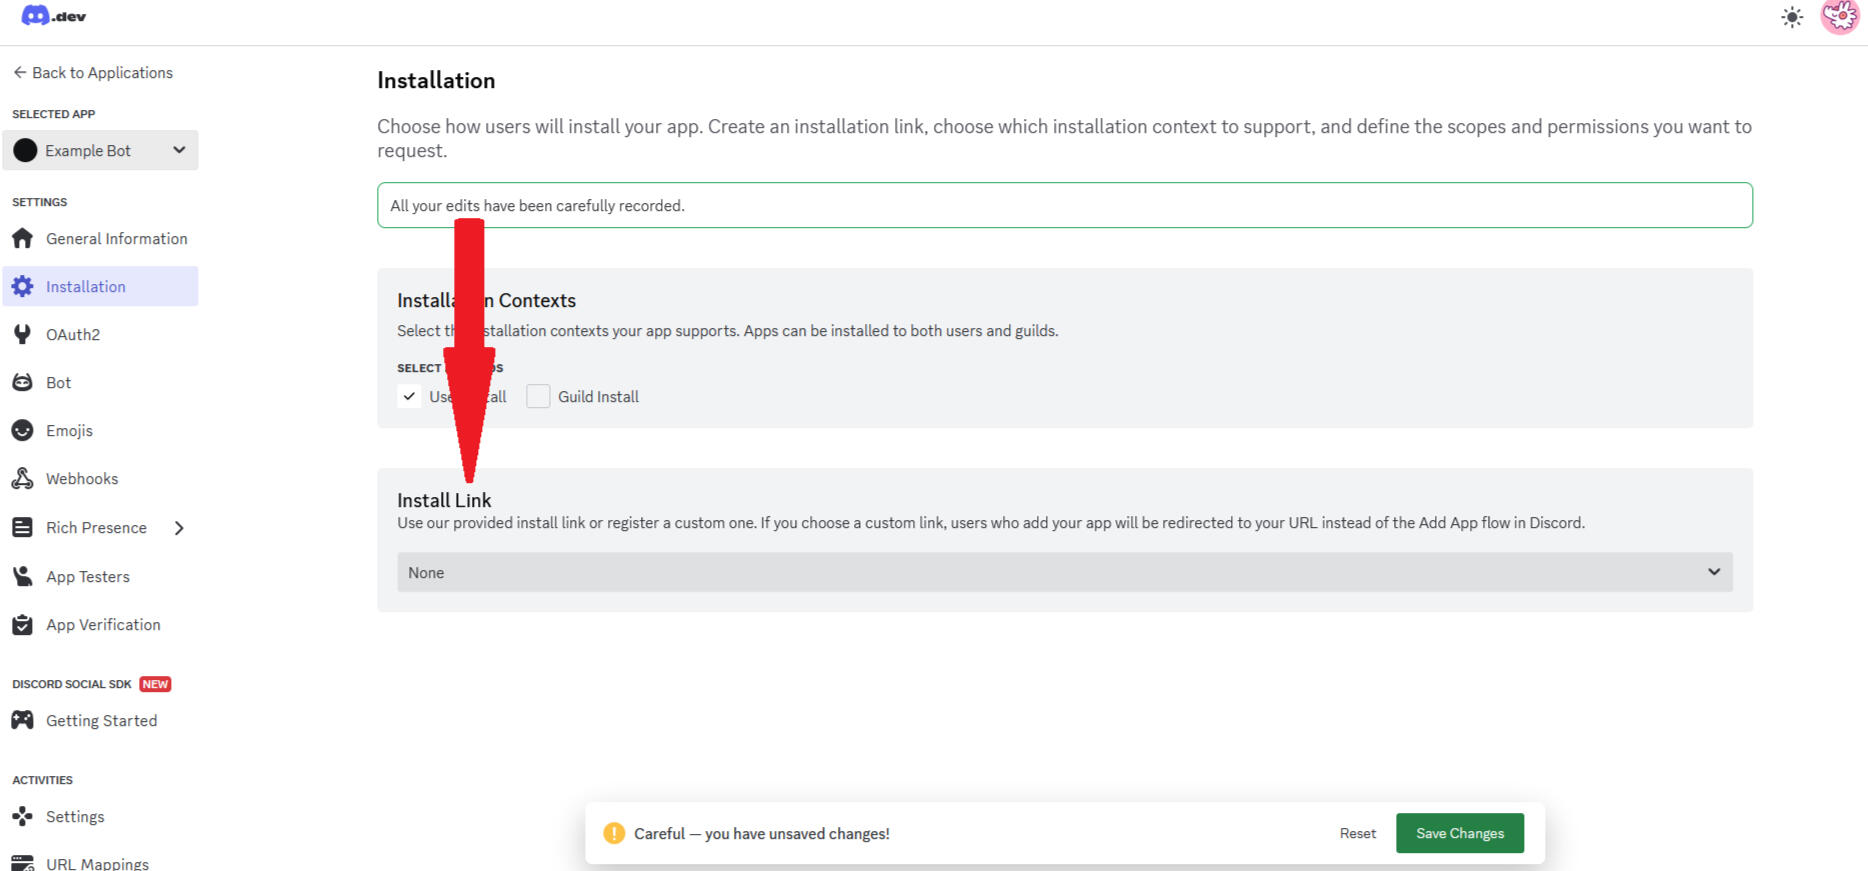
Once you are on the installation page, you will see an install link, copy that and paste it into your browser. Discord will launch a pop up and prompt you to either add to your apps or to a server. You want to add it to your apps. Discord will ask you to authorize it. After that, click the menu under install link and change it to none and uncheck guild install. This is for privacy reasons to prevent people from adding your bot to their profiles. At the bottom, click save changes.
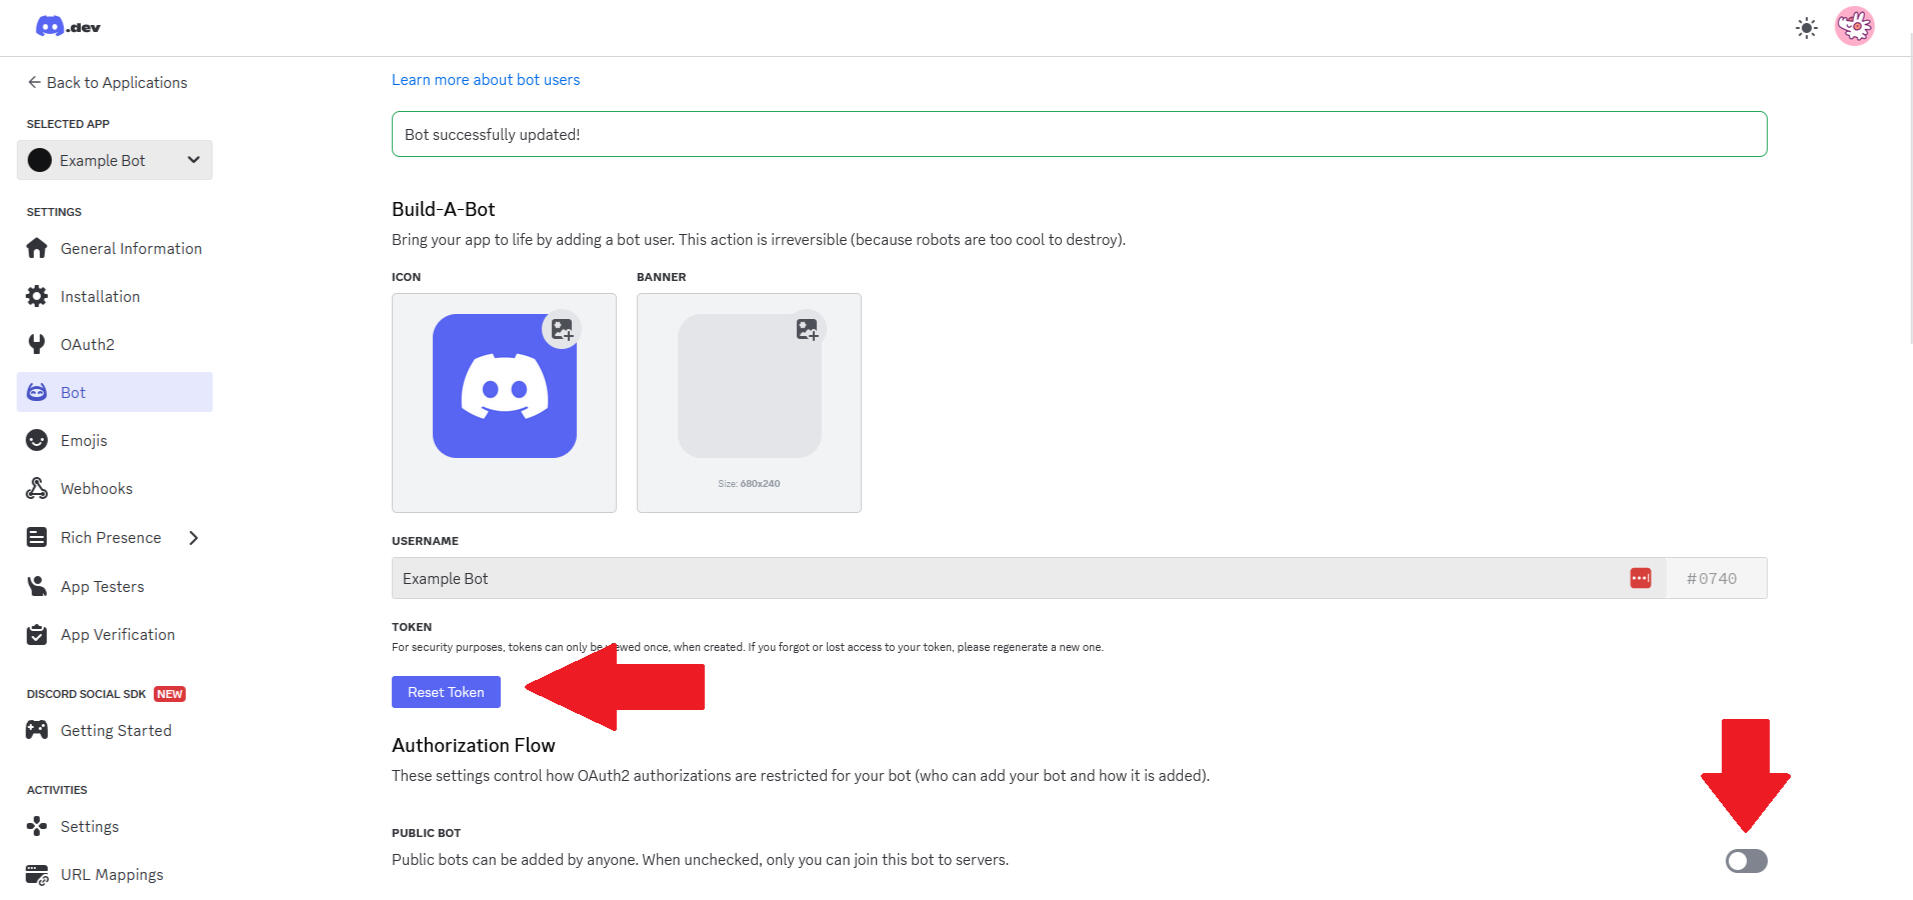
Next, we're going to go to the bot page found on the left side. Here you can customize the app icon, banner, and username. These will show up when you proxy with the bot and can be changed at any time from this webpage. We are going to scroll down a little bit and do two things. First, uncheck "Public Bot". This will prevent other people from adding the bot to their accounts. Hit save changes. Next, go to Token and click "Reset Token", click that you are sure, and then if prompted enter your Multi-Factor Authentication. Once you do, a long string will show up under the token, copy this and keep it somewhere safe where no one else can access it. This is the key to your bot that we will need later in the code section. Do not give it to anyone else or they can get access to the bot and could potentially do something malicious.
Now our discord app is made! Next up, we're going to install python and the discord python library onto our computer to be able to make and run the program.
Installing Python
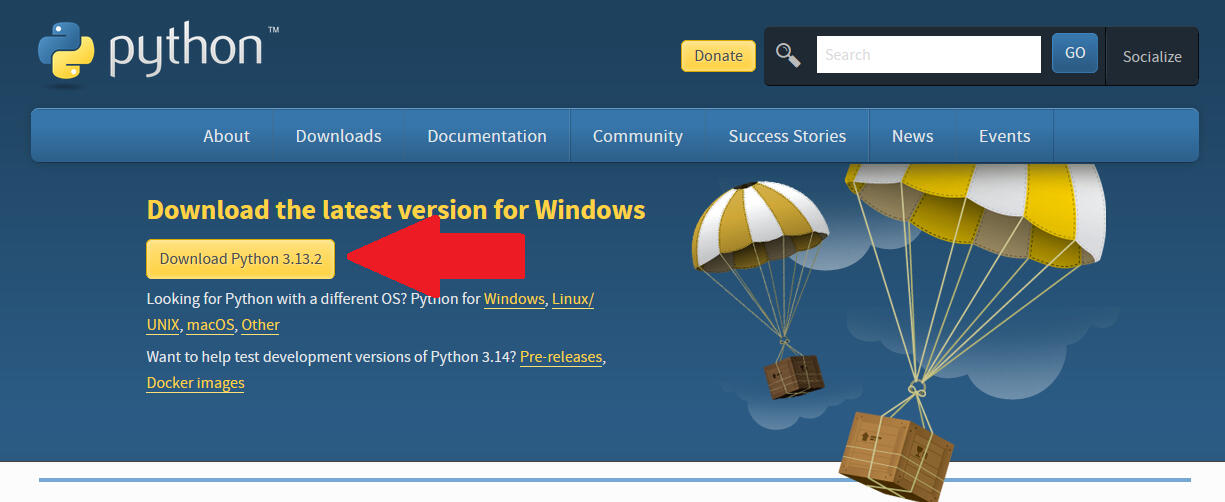
In this section we are going to install python and get a coding environment set up. It is essential that the computer you are running the bots on has python and the discord python library installed.To begin, go to the python website (link) and download the latest version of python. Download the version appropriate for your operating system. It will download a program and you will need to run that program to install python.
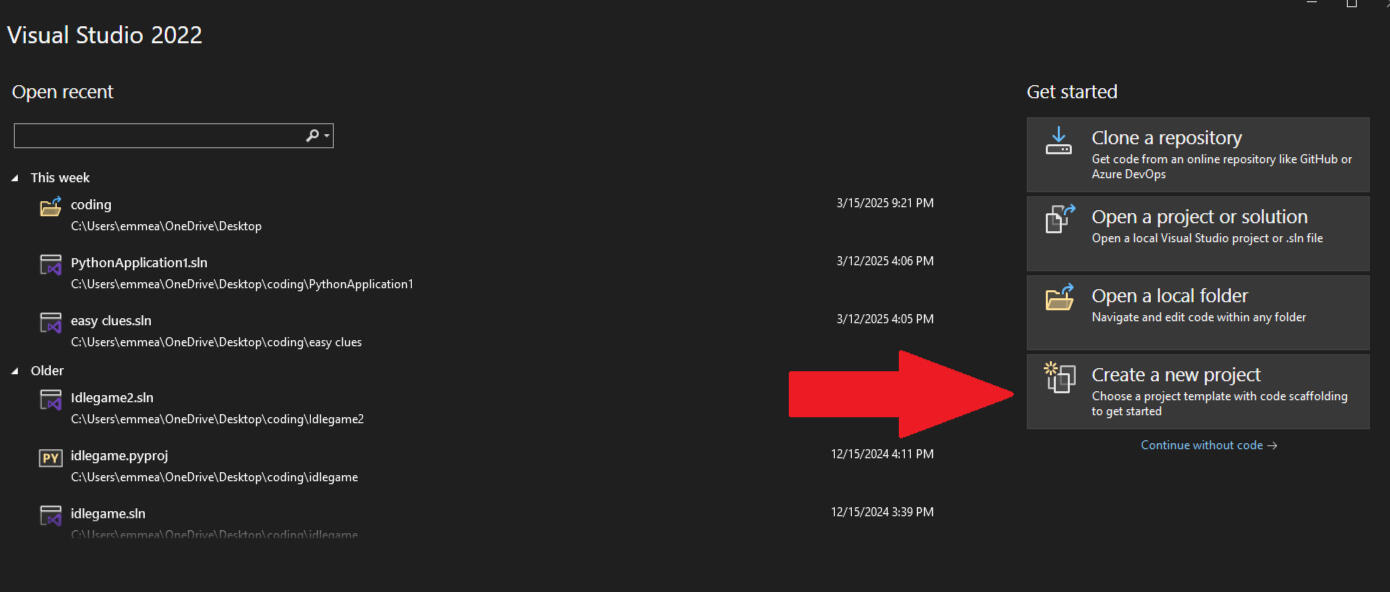
Next, we will be creating a coding environment. For the purposes of this guide, we will be using Visual Studio Community 2022. You can install it from (this link). Download the version appropriate for your operating system. Once downloaded, install it and open it. Click "Create a new project"
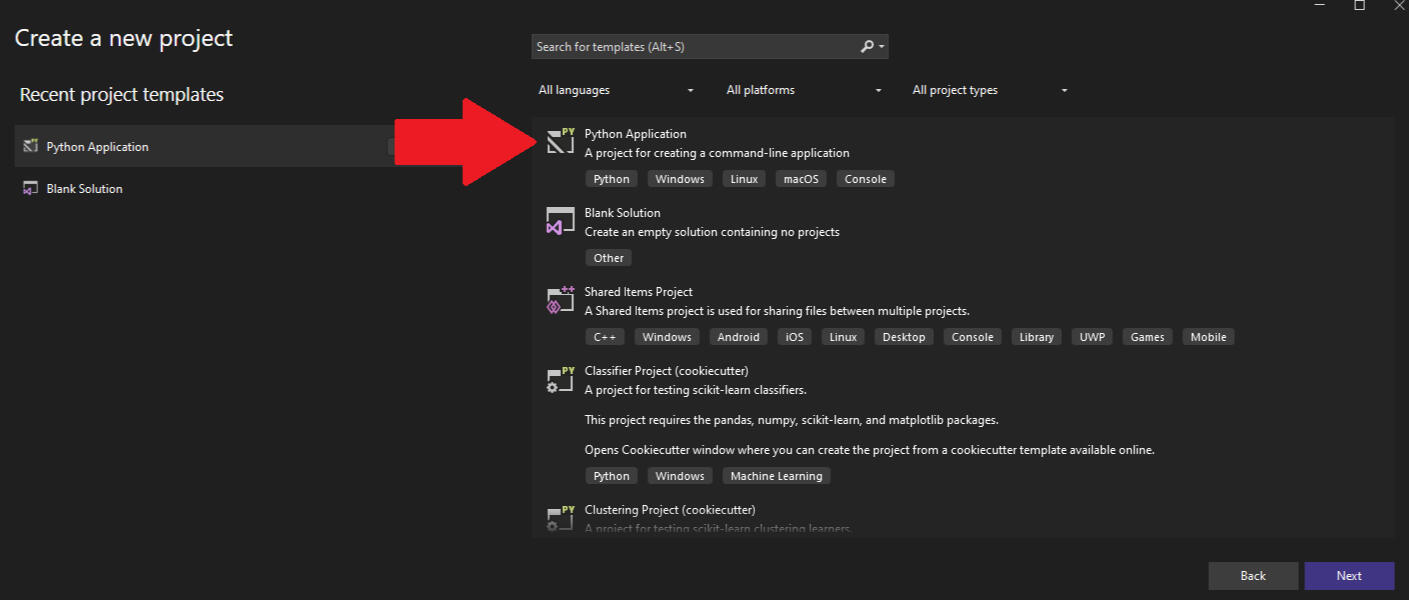
From there, click "Python Application" and then next. Name your project and choose where to save it to. Make it somewhere you will remember.
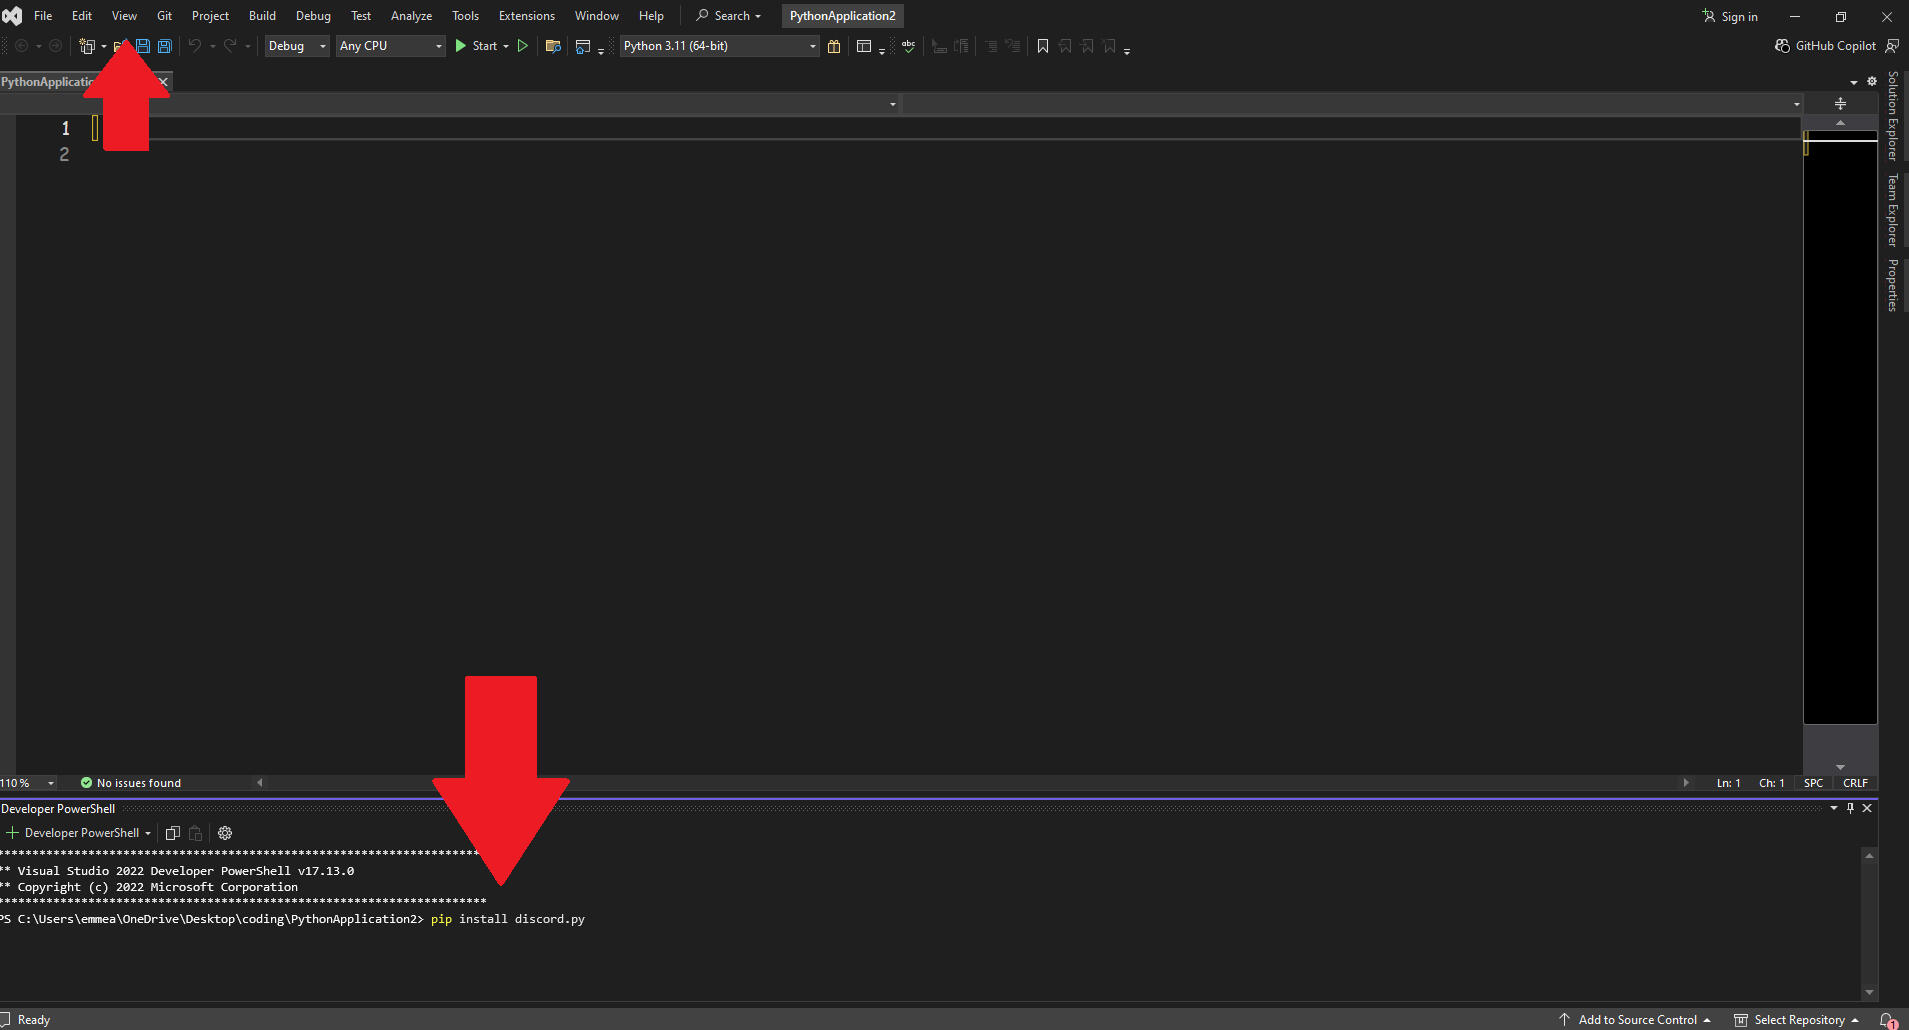
Once your file is created, we're going to go the top of the program and do sure View > Terminal. At the bottom of the screen there should be a command line labeled "Developer Powershell". In it, type pip install discord.py and hit enter. This will download the discord library to your computer. After this, we are ready to code!
The Source Code
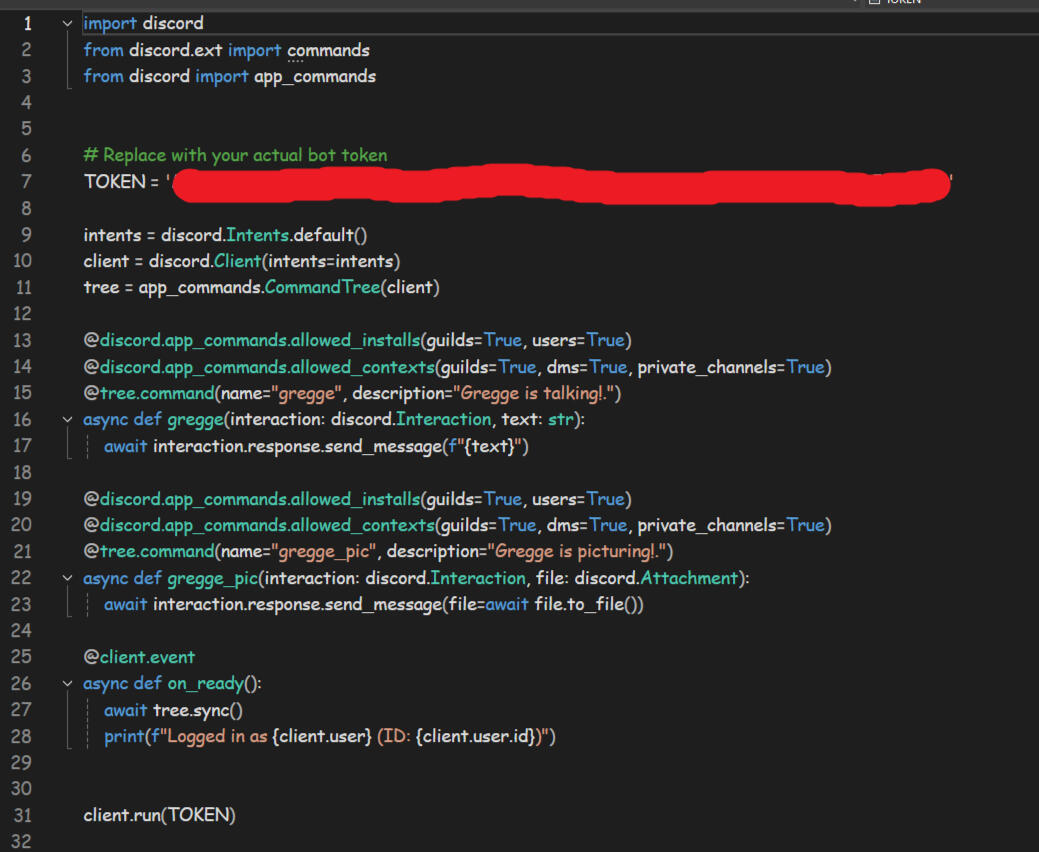
Here I will give you the code I use for my own proxy bots along with explanations for what each part does. The website doesn't like indenting, so I will also post a screenshot of the code to show where to indent, but basically just put an indentation in front of each "await" and the "print"
import discord
 from discord.ext import commands
 from discord import app_commands
TOKEN = '(YOUR BOT TOKEN FROM EARLIER)'
intents = discord.Intents.default()
client = discord.Client(intents=intents)
tree = app_commands.CommandTree(client)@discord.app_commands.allowed_installs(guilds=True, users=True)
@discord.app_commands.allowed_contexts(guilds=True, dms=True, private_channels=True)
@tree.command(name="gregge", description="Gregge is talking!.")
async def gregge(interaction: discord.Interaction, text: str):
await interaction.response.send_message(f"{text}")@discord.app_commands.allowed_installs(guilds=True, users=True)
@discord.app_commands.allowed_contexts(guilds=True, dms=True, private_channels=True)
@tree.command(name="gregge_pic", description="Gregge is picturing!.")
async def gregge_pic(interaction: discord.Interaction, file: discord.Attachment):
await interaction.response.send_message(file=await file.to_file())@client.event
async def on_ready():
await tree.sync()
print(f"Logged in as {client.user} (ID: {client.user.id})")client.run(TOKEN)
Code Explanation
imports: these bring in the discord python library for the botTOKEN: replace this with the token we got earlier when making the discord app. if you've lost it, go back to the discord developer portal and reset the token and copy it from there. Make sure there are quotes around the tokenintents/client/tree: this stuff just primes the bot basically@discord.app_commands.allowed_installs(guilds=True, users=True)
@discord.app_commands.allowed_contexts(guilds=True, dms=True, private_channels=True)
@tree.command(name="gregge", description="Gregge is talking!.")
async def gregge(interaction: discord.Interaction, text: str):
await interaction.response.send_message(f"{text}")
This is the first command. The first two lines allow the command to be run in dms and on servers that allow slash commands. The tree.command line lets you name and describe the command, only you can see this and you can replace "gregge" with whatever you want to name the command, however the name MUST be lowercase. The next line change "gregge" for whatever you'd like as well, but again LOWERCASE, this line says that when you do /gregge, it will prompt you to input text afterwards. The last line is the bot sending the text input itself.@discord.app_commands.allowed_installs(guilds=True, users=True)
@discord.app_commands.allowed_contexts(guilds=True, dms=True, private_channels=True)
@tree.command(name="gregge_pic", description="Gregge is picturing!.")
async def gregge_pic(interaction: discord.Interaction, file: discord.Attachment):
await interaction.response.send_message(file=await file.to_file())
This is the next command. This does essentially the same thing except it will prompt you for a file instead of text, allowing you to send a file (I mainly do images) through the proxy. Again, replace any instance of "gregge" with whatever you would like, however the name and async def MUST be lowercase.The on_ready just prints into the window that the bot is ready and the client.run(TOKEN) is needed to run the bot.
Running The Bots
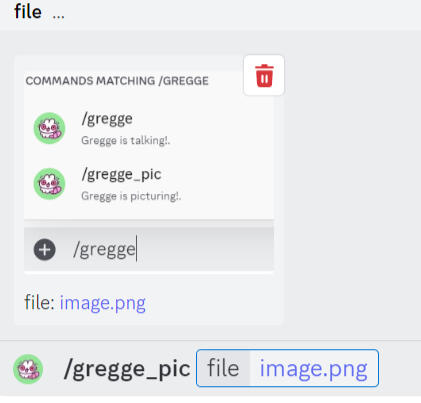
Running the bots is very simple! Once you have all the code saved, you just have to run the program with python. On windows at least, you can right click the .py file and select open with > python to run it. If you would like to, you can open a command prompt window and change directory with cd into the folder where the .py file is kept and do python your_file.py and run it that way. This is how I do it on my linux server.Once you have the bots running for the first time, you will need to restart your discord client to get the slash commands to show up. This is very important. If the bot is running and you do not see the slash commands, make sure you force close discord all the way, not just minimize it.This is what the slash commands will look like. They will work anywhere slash commands are available, including dms!


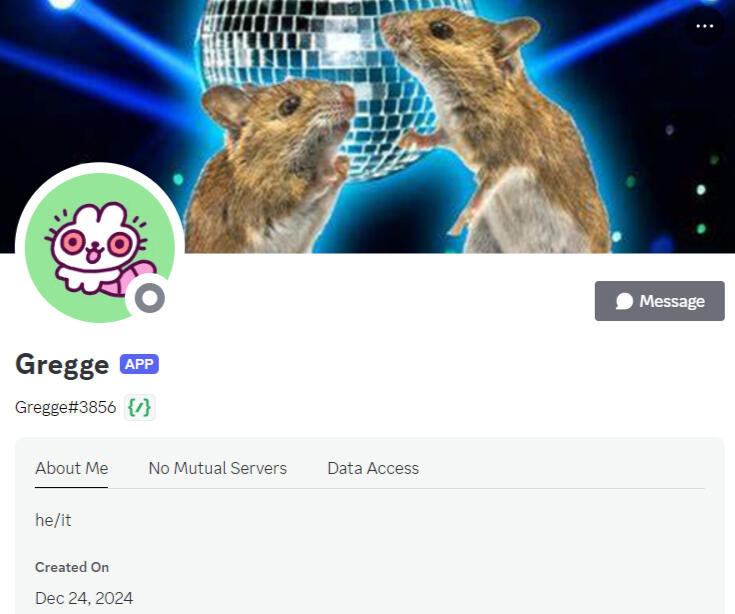
To change the appearance of the bot, go back to the discord developer portal and select the app you want to edit and you can change the profile picture, header, and description! I personally put the pronouns of the person I am proxying into the description, but you can put anything you want. This is what the proxy profile will look like on discord.
Hooray! You've done it! You can now proxy with this profile anywhere on discord that allows slash commands, even in direct messages with people! Now, if you want more than one proxy, repeat the instructions for making a discord app and copy the code into a new python application file, replacing the token for the new one and such. Enjoy!